WordPress session timeouts can be frustrating, especially when you’re logged out unexpectedly while working on your site. These interruptions often stem from issues with authentication cookies, browser settings, plugins, or server configurations. Here’s how to fix it:
- Clear Cookies and Cache: Expired or corrupted cookies often cause session problems. Clear your browser’s cookies and cache to ensure fresh data loads.
- Check Cookie Settings: Verify that your browser and WordPress URL settings allow proper cookie handling.
- Deactivate Plugins: Conflicting plugins can disrupt sessions. Disable all plugins, then reactivate them one by one to identify the issue.
- Switch Themes: Poorly coded themes can interfere with session cookies. Test with a default WordPress theme.
- Extend Session Duration: Modify WordPress’s default session length using code or plugins for longer login periods.
- Clear Caches: Server or plugin caches can serve outdated authentication data. Clear all caches, including CDN caches.
- Adjust PHP Settings: Increase the
session.gc_maxlifetimevalue in your server’s PHP settings to extend session validity.
Each solution targets a specific cause, helping you regain uninterrupted access to your WordPress dashboard.
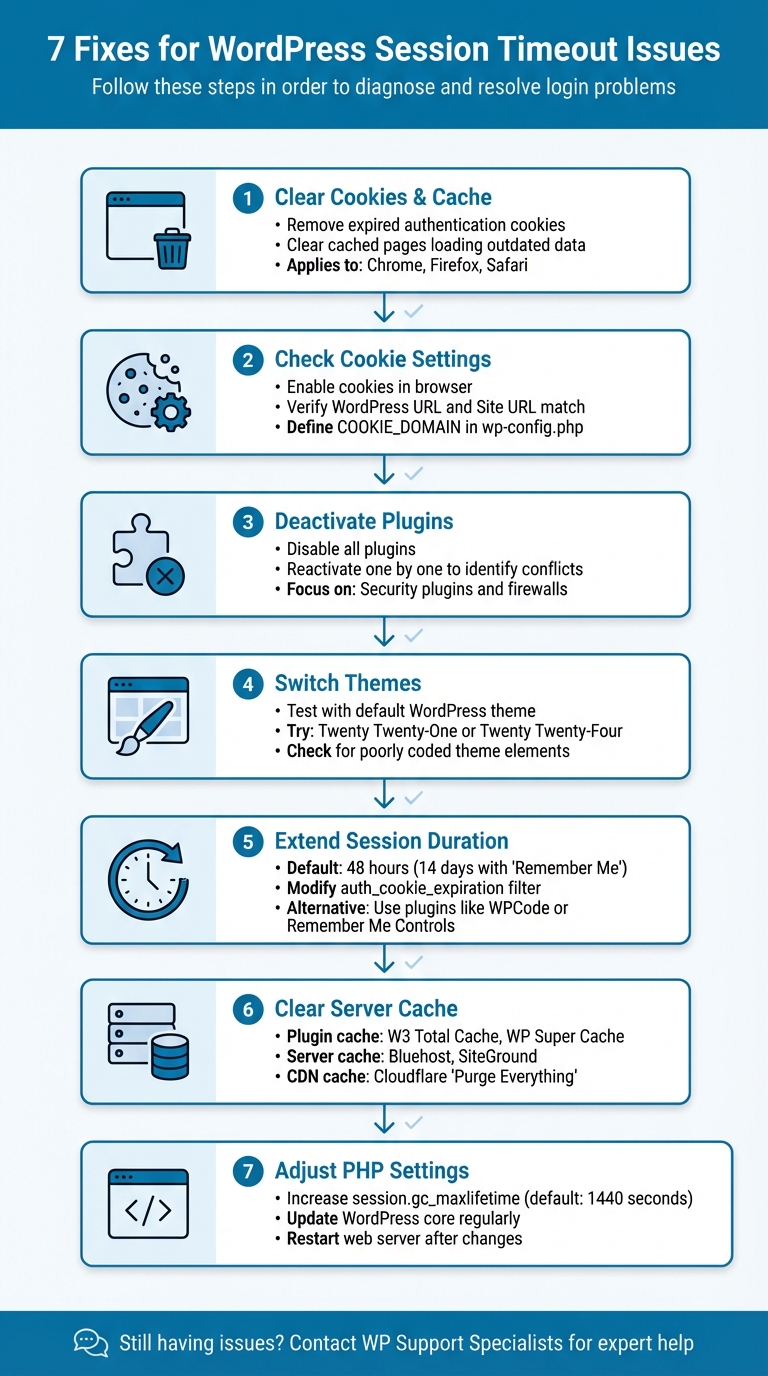
7 Step Troubleshooting Guide for WordPress Session Timeout Issues
How to Fix WordPress Keeps Logging Out Problem
Fix 1: Clear Browser Cookies and Cache
Your browser uses authentication cookies like wordpress_[hash] and wordpress_logged_in_[hash] to verify your WordPress login. When these cookies expire or become corrupted, they can disrupt your session authentication.
This problem often occurs when an expired cookie overrides a new login attempt. Matteo Duò, Head of Content at Kinsta, explains:
"If the cookie has expired but mistakenly overrides your recent login, it can cause the error".
Similarly, cached pages may load outdated data, which can interfere with authentication.
To ensure your browser loads the most up-to-date data, clear its cookies and cache. Here’s how to do it in the most commonly used browsers:
- Chrome: Open the three-dot menu (⋮) in the top-right corner, go to More Tools > Clear browsing data (or press
Ctrl+Shift+Del). Set the time range to All time, check both Cookies and other site data and Cached images and files, then click Clear data. - Firefox: Click the menu button (☰), select Settings, and navigate to the Privacy & Security section. Scroll to Cookies and Site Data, click Clear Data, check both Cookies and Site Data and Cached Web Content, and click Clear.
- Safari on Mac: Click Safari in the menu bar, choose Settings (or Preferences), go to the Privacy tab, click Manage Website Data, and select Remove All.
Keep in mind, clearing cookies will log you out of most websites. Make sure you have your WordPress login details ready before proceeding.
If clearing cookies and cache doesn’t fix the timeout issue, it’s time to review your browser’s cookie settings.
Fix 2: Check and Adjust Cookie Settings
If clearing cookies didn’t solve the problem, it’s possible that incorrect cookie settings are causing the issue. WordPress relies on authentication cookies to maintain your login session. If these cookies are blocked or if the cookie domain doesn’t match, you’ll get logged out. Albert Ślusarczyk, Co-creator of BeTheme, explains:
"The root of this error lies in the WordPress login process. WordPress puts an authentication cookie in your browser at the beginning of a login session. This cookie is designed to match the WordPress Address URL from your settings. If they do not match… the session can’t authenticate."
To fix this, you’ll need to adjust both your browser and site settings to ensure cookie permissions are set up correctly.
Adjust Browser Cookie Settings
First, make sure your browser allows cookies. Here’s how to check and adjust settings in some popular browsers:
- Google Chrome: Go to Settings > Privacy and security > Third-party cookies and add
yourdomain.comto the allowed list. - Safari: Open Settings > Privacy and uncheck the option to "Block all cookies."
- Firefox: Navigate to Settings > Privacy & Security and set Enhanced Tracking Protection to "Standard."
Verify WordPress URL Settings
After confirming your browser settings, check your WordPress URL settings to ensure there are no mismatches. In your dashboard, go to Settings > General and verify that the WordPress Address (URL) and Site Address (URL) are identical. Even a slight mismatch here can cause session timeouts.
If you can’t access your WordPress dashboard, you can manually update the URL settings by editing the wp-config.php file. Add the following lines just above /* That's all, stop editing! Happy blogging. */:
define('WP_HOME', 'https://yourdomain.com'); define('WP_SITEURL', 'https://yourdomain.com'); define('COOKIE_DOMAIN', 'yourdomain.com'); Replace yourdomain.com with your actual domain name, and make sure not to include a trailing slash. For websites using subdomains or subdirectories, explicitly defining COOKIE_DOMAIN ensures WordPress doesn’t make incorrect guesses.
Check for Invisible Characters in Config Files
Lastly, review your wp-config.php file for any hidden characters that might interfere with cookie settings. Open the file in a code editor, remove any blank lines before <?php, and save the file as UTF-8 without BOM. This small step can prevent unexpected cookie-related issues.
Fix 3: Deactivate Conflicting Plugins
If your cookie settings seem fine, the next likely culprit for session timeouts could be plugin conflicts.
Sometimes, plugins that don’t follow WordPress coding standards can interfere with authentication cookies, leading to session timeout issues. As OptinMonster explains:
"OptinMonster uses WordPress best practices to be as compatible as possible with other plugins. But sometimes other developers don’t also follow these standards. As a result, there can be occasional theme or plugin conflicts."
To pinpoint the problematic plugin, you’ll need to disable them all and test. If you can still access your WordPress dashboard, head to Plugins > Installed Plugins, select all, choose Deactivate from the Bulk Actions dropdown, and click Apply. If you’re locked out of the dashboard, you can use FTP/SFTP to rename the plugins folder to plugins_old, or disable all plugins via WP-CLI by running wp plugin deactivate --all.
Once all plugins are deactivated, try logging in again. If the session timeout issue is resolved, rename the folder back to plugins and begin reactivating your plugins one by one. Check your login after each activation to identify the source of the problem. As Albert Ślusarczyk points out:
"If the problem goes away while a particular plugin is disabled then that plugin is the cause of the error."
Pay close attention to security plugins and firewalls, as they can sometimes misinterpret normal login attempts as threats, causing unexpected timeouts. Once you’ve identified the conflicting plugin, you can either remove it, reach out to the developer for support, or look for an alternative.
If plugins aren’t the issue, it’s time to test your current theme for potential conflicts in the next step.
Fix 4: Switch to a Default WordPress Theme
After tackling browser and plugin issues, the next step is to test if your WordPress theme is causing the problem. Sometimes, the active theme’s code can interfere with session cookies, leading to timeout issues.
To check if your theme is the culprit, try temporarily switching to a default WordPress theme like Twenty Twenty-One or Twenty Twenty-Four. If you can access the WordPress dashboard, go to Appearance → Themes and activate a default theme. If you’re locked out of the dashboard, you can rename your current theme’s folder using FTP. This forces WordPress to fall back to a default theme. This simple test can help you determine if your theme is behind the session timeout error.
If switching to a default theme resolves the issue, it confirms the problem lies with your original theme. As Albert Ślusarczyk, co-creator of BeTheme, explains:
"Themes with poorly coded elements can interfere with session cookies. If you encounter persistent issues, try switching to a default WordPress theme to see if it resolves the WordPress session expired problem."
Before making any changes, back up your site. While your core content will remain intact, custom settings tied to your original theme may not carry over.
If the default theme fixes the issue, there are a few steps you can take next:
- Check for updates to your original theme.
- Review any custom code in the
functions.phpfile for potential conflicts. - Contact the theme developer for assistance.
However, if the problem persists even with a default theme, it might be time to consider extending your login session duration, which is covered in the next fix.
sbb-itb-976b402
Fix 5: Extend Login Session Duration
If you’re still experiencing timeouts after testing your theme, the issue might be related to WordPress’s default session duration. By default, WordPress logs users out after 48 hours – or 14 days if you’ve checked the "Remember Me" option.
To extend the login session, you can add a small piece of code to your child theme’s functions.php file. Here’s how:
- Navigate to Appearance → Theme Editor in your WordPress dashboard.
- Open your child theme’s
functions.phpfile. - Add this code snippet:
add_filter( 'auth_cookie_expiration', 'custom_login_session' ); function custom_login_session( $expire ) { return YEAR_IN_SECONDS; // Sets duration to 1 year } WordPress makes this process simpler by providing constants like DAY_IN_SECONDS, WEEK_IN_SECONDS, MONTH_IN_SECONDS, and YEAR_IN_SECONDS, so you don’t need to calculate the time manually. As Jeff Starr points out, these constants are handy for customizing session durations.
If editing code isn’t your thing, you can use plugins like Remember Me Controls, Biscotti, or WPCode. These tools offer user-friendly interfaces to adjust session durations without touching any files. For instance, WPCode includes a pre-written snippet called "Extend Login Expiration Time", which can extend sessions to 30 days with just a few clicks.
While extending session durations can make logging in more convenient, it does come with security concerns, especially on shared or compromised devices. This approach is best suited for local development or single-user sites. For live or multi-user environments, consider pairing it with security measures like two-factor authentication and limits on login attempts.
Fix 6: Clear WordPress and Server Cache
Caching is a great way to speed up your site by storing static versions of your pages. However, it can sometimes cause trouble, like serving expired authentication cookies or outdated session identifiers (e.g., PHPSESSID), which might lead to repeated logouts. As Matteo Duò, Head of Content at Kinsta, explains:
"The page may be cached in your browser and could be trying to authenticate the session through an expired cookie".
To tackle these caching issues affecting your WordPress login, here’s what you can do:
Clear Plugin Cache
- W3 Total Cache: Head to the Performance menu in the admin bar and select "Purge All Caches."
- WP Super Cache: Either use the "Delete Cache" option in the admin bar or go to Settings » WP Super Cache and click "Delete Cache" under "Delete Cached Pages."
- WP Fastest Cache: From the admin bar, choose "Clear All Cache" in the Delete Cache menu.
Clear Server Cache
For hosting providers like Bluehost, use the "Purge All" option under Caching. If you’re with SiteGround, you can purge the cache via SG Optimizer or go to Site Tools » Speed » Caching » Dynamic Cache to flush it.
If you can’t access your WordPress dashboard, you can use FTP to delete all files in the /wp-content/cache/ directory. Make sure to leave the folder itself intact.
Clear CDN Cache
If you’re using a CDN, don’t forget to clear its cache as well. For instance, if you’re on Cloudflare, log in to your account and select "Purge Everything" to ensure all servers are updated with the latest authentication data.
Still running into issues? Consider reaching out to WP Support Specialists for professional WordPress assistance.
Fix 7: Adjust PHP Session Settings and Update WordPress Core
If you’re dealing with session timeouts, it’s worth checking your PHP session settings. The session.gc_maxlifetime setting is a key factor here – it controls how long the server keeps session data before clearing it. By default, this is set to 1440 seconds (24 minutes). If your sessions are ending too soon, increasing this value might help.
To adjust this, locate your php.ini file (commonly found in directories like /etc/php/ on Linux or the PHP installation root). Open the file in a text editor, find the session.gc_maxlifetime line, and increase the value (measured in seconds). For example, setting it to 86400 will extend the session timeout to 24 hours. After making the change, restart your web server (e.g., Apache or Nginx). To confirm the new value, you can create a PHP file with the following code:
<?php echo ini_get("session.gc_maxlifetime"); ?> However, if you’re using a Debian- or Ubuntu-based server, be aware of a specific quirk: runtime changes to this setting might not take effect because these systems often rely on a cron job to handle session cleanup. In such cases, update the global value in /etc/php/X.X/apache2/php.ini or edit the cron job located at /etc/cron.d/php. Additionally, avoid setting session.gc_maxlifetime higher than 65535, as exceeding this limit can cause PHP session issues.
While adjusting PHP settings is essential, don’t overlook the importance of keeping your WordPress core updated. Regular updates address bugs, improve cookie handling, and enhance overall performance. Make it a habit to check the "Updates" section in your WordPress dashboard weekly. Start by updating the WordPress core, followed by plugins and themes. After completing updates, clear both your website and browser caches to ensure everything runs smoothly with the new settings.
If session problems persist despite tweaking PHP settings and updating WordPress, there could be a deeper issue. In such cases, reaching out to WP Support Specialists for expert help can save you time and frustration.
Conclusion
Session timeout issues can disrupt your workflow and create frustration for users, but the solutions outlined here can help you address the problem effectively. From basic fixes like clearing your browser cookies and cache, verifying cookie settings, and checking for plugin conflicts, to more advanced steps such as switching to a default theme, extending your login session duration, clearing server-side caches, or adjusting PHP session settings – there’s a range of options to explore.
Staying on top of WordPress maintenance is key to avoiding these interruptions. Regularly updating your core files, plugins, and themes can prevent small glitches from turning into bigger headaches. Always back up your site before making changes, and periodically audit your plugins to remove any outdated or unnecessary ones. Additionally, ensure that your WordPress Address and Site Address are identical in your General Settings. Knowing the default session timeframes can also help you strike the right balance between user convenience and security.
If the problem persists, it might be time to dive into more technical areas. Issues like server configurations, file permissions, or memory limits may require professional expertise. In such cases, reaching out to experts like WP Support Specialists can save you time and effort. Their team focuses exclusively on WordPress, offering help with everything from PHP session tweaks to security audits and urgent fixes.
FAQs
How can I tell if a plugin is causing WordPress session timeout issues?
If you’re dealing with session timeout issues in WordPress and suspect a plugin might be the culprit, here’s how you can pinpoint the problem:
- Create a backup of your site: Before making any changes, save a full backup. This ensures you can restore your site if something goes wrong.
- Turn off all plugins: If you can’t access your WordPress admin area, use an FTP client to rename the
wp-content/pluginsfolder. This action disables all plugins at once. - Check the login: Try logging in again. If the session timeout issue is resolved, it’s likely that one of your plugins is causing the problem.
- Reactivate plugins individually: Enable each plugin one by one, testing the login after each activation. When the issue reappears, you’ve found the problematic plugin.
- Use debugging mode: Add
define('WP_DEBUG', true);to yourwp-config.phpfile. This will display error messages that might provide clues about the plugin causing trouble.
Once you’ve identified the plugin responsible, you can try updating it, tweaking its settings, or replacing it with an alternative. If you’re uncertain or need assistance, WP Support Specialists offer professional plugin audits to help you resolve such issues efficiently.
What are the security risks of extending WordPress login session times?
Extending the duration of WordPress login sessions can make things easier for users, but it also comes with some serious security concerns. When session times are longer, a stolen or intercepted session cookie becomes a bigger problem – it can be misused for a much longer period. This increases the risk of session hijacking or unauthorized access, especially if users leave their accounts open on shared or public devices or lose their personal devices.
On top of that, longer session durations can weaken security features like two-factor authentication and expose vulnerabilities related to session management. To strike the right balance between convenience and security, it’s smart to keep session times short while adding extra protections. These might include using secure cookies, rotating tokens frequently, and requiring re-authentication for sensitive actions.
How do I adjust PHP session settings to fix WordPress timeout issues?
To tackle WordPress session timeout problems, you can modify PHP session settings to extend both the session lifetime and cookie expiration. Here’s how you can do it:
First, locate your php.ini file, typically found in /etc/php/7.x/apache2/, or use a .user.ini file if you don’t have access to the main configuration file. Once located, adjust these values:
session.gc_maxlifetime = 43200(sets the session duration to 12 hours in seconds)session.cookie_lifetime = 43200(ensures the cookie matches the session length)
If you don’t have permission to edit php.ini, you can insert these settings directly into your wp-config.php file like this:
ini_set('session.gc_maxlifetime', 43200); ini_set('session.cookie_lifetime', 43200); After applying these changes, restart your web server to ensure they take effect. To confirm the updates, create a PHP info file and check the applied settings. If you’re unsure about any step, reaching out to WP Support Specialists can provide expert guidance on session settings and optimizing your WordPress site.