Within WordPress, the Custom Post Type editors have the same functionality for Posts and Pages, with Posts having additional fields for categories, tags and featured images and Pages having page templates. If you have several plugins, the Pages view may be somewhat cluttered, but you can use the Screen Options function to show or hide different items.
Getting to Know WordPress Editor
While the Editor is nearly exactly the same, there’s a fundamental difference between the two.
Posts: WordPress posts are listed by most recent date order on your posts page. However, sticky posts will appear at the top of the list. You can apply categories and tags to your posts to help organize them. Posts are available in the following widgets: Recent Posts, Categories, and Archives, and there are many settings to help you control how the posts are displayed.
Pages: Pages are not listed in date order, and they are static. Pages usually include Home, About, Services and Contact Us pages, which remain mostly the same all the time. Pages can be included in the Pages widget of your site’s sidebar, as well as in the navigation bar at the top of your page.
You can have an unlimited amount of pages and posts.
For the purpose of this tutorial, imagine we are adding a new Post. Here’s what you will do:
1. In your admin area, hover over the menu item Posts (either on the left, or in the top menu), and click on Add New to open the editor screen. It will then open the Editor.
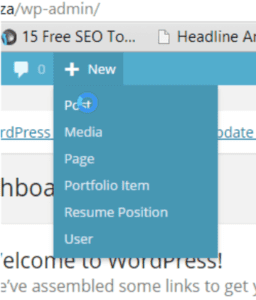
2. You will see the following menu (less the form buttons – those are there due to a plugin installed on our side).
![]()
3. Click on the kitchen sink (Toolbar Toggle) button to display more options.
![]()
You will probably recognise many of the buttons from your word processing program and email, such as Bold, Italic, Underline, Hyperlink, undo, redo, justify, spell check, bullets and numbering.
In most cases, you have to select text before the buttons will be clickable.
For this post, we will focus on the new elements available to you in WordPress, such as Add Media, which allows you to insert images and videos. As a new user, we will assume that you don’t have a Media Library on your server yet, and that you want to insert an external image. Let’s get right to it.
Click on Add Media, and wait for the following screen to appear.
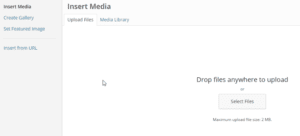
You can choose from the following options:
- Insert from URL to use an image that is already on a website to which you have access. Warning: Do NOT use images that don’t belong to you!
- Upload a file from your computer.
- Media Library allows you to select files that are already uploaded onto your website server.
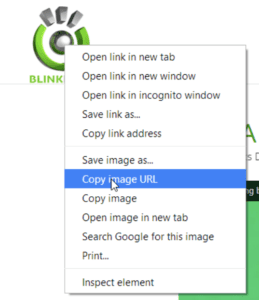
Inserting an image from URL
To insert an image from URL, you need to first obtain the image URL. Right-click on the image you want to insert and select Copy Image URL.
Now head over to your WordPress post, and right click on the Insert URL field and click Paste. The image should appear, along with fields to provide Alt Text and edit the size of your image.
Click on Insert to Post to upload the image.
Uploading an Image From Your Computer
From the Insert Media window, click on Upload Image to insert an image that is already saved on your computer. In the middle of the page, click on Select Files.
A Windows Explorer window will open, from where you can navigate and select the image you want to insert. When you have found it, select it and click on open.
Again, you will be able to insert Alt Text, change sizes and more, before clicking on Insert to Post.
Insert From Media Library
If you have images uploaded to your server, you will be able to insert images from your Media Library. In the Insert Image view, click on Media Library. A snapshot with thumbnails of your available images will appear.
Select the image you want to insert, insert the Alt Tags, change the size if you wish, and click on Insert into Post.
Your image will be imported into your post or post, from where you can move it into the exact position where you want it to be. It’s really that simple.
If you need WordPress Support, don’t hesitate to get in touch with WP Support Specialists.