When moving your WordPress website manually, you can expect that it will be time-consuming and that you need some technical knowledge like updating URLs in SQL files, etc. In addition, you must execute all steps in the correct order to be successful.
There are various excellent WordPress migration plugins that you can try and that would take care of all the steps needed to ensure the migration of your website to your new host without any issues.
The best WordPress migrator plugins that you can try out include:
- WordPress Duplicator (Freemium)
- BackupBuddy (Premium)
- VaultPress ( Premium)
- WP Clone (Free)
- Migrate guru (Premium)
- WP Migrate DP (Premium)
- All-In-One WP Migration (Free)
- UpdraftPlus (Freemium)
This article will describe how you can move your WordPress site from localhost to your live server using the WordPress Duplicator plugin.
Why Use WordPress Duplicator Plugin?
Duplicator handles most of the work you would otherwise need to do manually, saving time and reducing the chance of an error. Duplicator will even install WordPress on the new server when you re-upload your package, saving you an extra step.
In addition, duplicator has a five-star rating on the WordPress repository and has been downloaded and installed over one million times.
With WordPress Duplicator, you can migrate, copy or clone, a WordPress site from one host to another.
Benefits of using WordPress Duplicator include:
- Relieves you from taking manual backups
- Migrate WordPress Websites from one host to another with ease
- Pull down a live site to localhost
- Easily duplicates website
- Schedule backups
- Connect to cPanel directly from the installer
- Database creation built into the installer
- Integrated transfer to cloud storage services such as Dropbox, Google Drive, and Amazon S3
Elements needed to move your WordPress site to a different server are a functional WordPress website developed on a local server and a web hosting plan matching the resource requirements of a site and compatible with PHP and MySQL/MariaDB you used on the localhost.
How To Migrate WordPress To Another New Host
Step 1: Download And Install WordPress Duplicator
Using the standard WordPress plugin installation, you can easily download and install WordPress Duplicator on your computer.
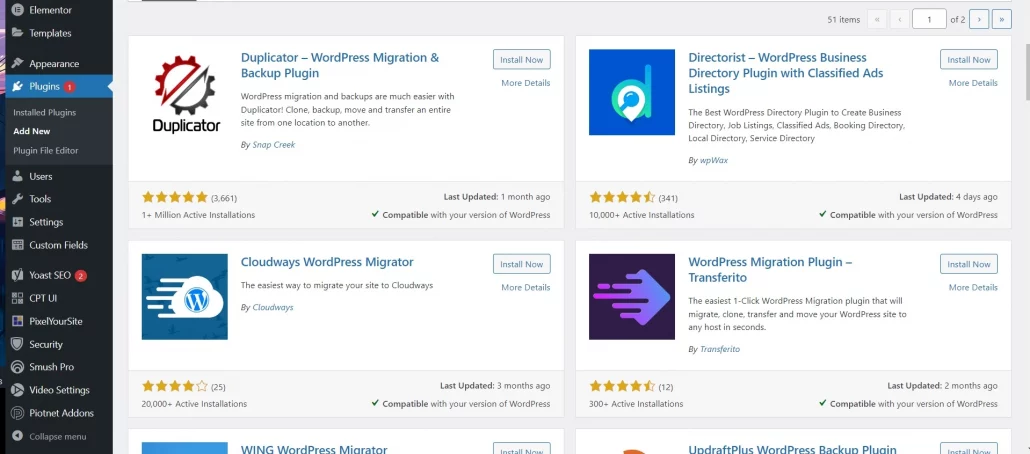
From your WordPress Dashboard, go to Plugins and select, Add New. Next, search for the WordPress Duplicator plugin in the top-right search bar.
Click, Install Now, and after installation, click the activate button.
Step 2: Export The WordPress Site
The second step will assist you to package the WordPress files on your local computer using the WordPress Duplicator plugin to enable the files to move to the live server.
Create & Setup a New Package
After installing and activating the WordPress Duplicator plugin, you will see the Duplicator menu on the left side of the WordPress dashboard.
Go to Duplicator and click the create button to build a new page.
Simply click the Next button to start the process, and then the Build button.
When the setup process is complete, you will receive two files; Installer and Archive. Download both files on your desktop.
Step 3: Import Your WordPress Site
After downloading both the archive and installer files, the next step is to upload them to your new web host.
You would usually enter your website’s domain name as host when connecting your FTP client.
At this stage, your domain name will still be pointing to your old host, and you need to connect by entering your server’s IP address or server hostname. You can find this information in your new account’s cPanel dashboard.
Using the FTP client, you need to upload both the installer.php file and your archive.zip file to the root directory of your website.
It is usually the /username/public_html/ folder.
You will also need the following information when connecting to FTP/SFTP
– Hostname
– Username
– Password
– Port Number
Ensure that your root directory is empty. If you find that WordPress is already installed in your root directory, you must delete WordPress first before continuing with the upload.
Step 4: Change The Host File
Once you’ve uploaded both files to your new host, you must access the installer.php file in a browser.
You can do this by using a URL like: https://www.example.com/installer.php.
This URL will take you to your old web host, and you will get a 404 error message. It’s due to your domain name still pointing to your old web host.
You can temporarily access your new site on your computer without affecting the old site through the host file on your computer or a temporary URL that your website hosting company can provide.
You can use the host file for domain names for specific IP addresses. In other words, it lets your computer think that the website moved even though it’s not.
You can access your new host using your domain name by making these changes, while other users will still be accessing your old site. In addition, this ensures 100% uptime.
Next, windows users must go to Programs » All Programs » Accessories, right-click on Notepad, and select Run as Administrator.
On the Notepad screen, go to File » Open and then navigate to the C:\Windows\System32\drivers\etc folder. From this folder, select the host file and open it.
At the bottom of the host’s file, you need to enter the IP address you copied and then enter your domain name. Like this:
192.168.1.22 www.example.com
Make sure to replace the IP address with the one you copied from cPanel, and example.com with your domain name.
Once done, save your changes.
You will now be able to access your files on the new host using your domain name.
Step 5: Creating MySQL Database On Your New Host
You need to create a MySQL database on your new hosting account before you can run the installer on your new host.
Create a Database In cPanel
- Go to your new hosting account.
- Scroll down to the Database section.
- Click the “Create Database” button.
Scroll down to the MySQL section after creating the MySQL database.
- Provide a username and password.
- Click the ‘Create a user button.’
- Add the user to the database.
The user you created will have all the permissions to work on the database.
Step 6: Start The Duplicator Migration Process
In your browser window, navigate to the following address, replacing example.com with your domain name:
https://www.example/com/installer.php
- The installer will run tests and show you ‘Pass’ next to archive and validation tests.
- Check the terms and conditions checkbox and continue by clicking the ‘Next” button.
- Enter your MySQL host, database name, username, and password.
- Click the ‘Test Database’ button to ensure you entered the correct information.
If Duplicator can connect, you will see a string starting with Pass. Otherwise, you will see the database connection error details.
- Click on the next button to continue.
Duplicator will now import your WordPress database from the archive zip into your new database.
You will be prompted to update the site URL or Path, but you don’t need to change anything since you are not changing domain names.
- Simply click on the next button to continue.
Duplicator will run the final steps and will show you the login button.
You can now log into your WordPress site on the new host to ensure everything runs smoothly.
Step 7: Switch DNS Nameservers
Even though you created a complete copy of your WordPress database and file on your new hosting server, your domain still points to your old web hosting account.
To update your domain, you need to switch your DNS nameservers. It will ensure that your users are taken to the new location of your website.
If you registered your domain with your hosting provider, it is best to transfer it to a new host. However, when using a domain registrar, you need to update your nameservers,
We recommend that you still leave the site files with your old host and wait until at least seven days after your migration before canceling your old hosting account.
Comments
At WP Support Specialists, we are passionate about WordPress, which means we stay up to date on the latest methods, processes, plugins, and best practices.
If you would rather use your time for something else and let us do the migration for you then checkout our WordPress Migration Page.
Do you want to discuss anything else? contact us here.