Your WordPress theme updates aren’t showing? It’s likely a caching issue. Caching speeds up your site by storing older versions of pages but can prevent recent changes from appearing. To fix this, you need to clear caches across different layers: browser, server, plugins, and CDN. Here’s a quick breakdown:
- Browser Cache: Stores static files locally. Hard refresh or clear cache manually.
- Server Cache: Managed by hosting providers. Clear it via your hosting dashboard.
- Caching Plugins: Tools like WP Rocket or W3 Total Cache store static pages. Clear or disable them if needed.
- CDN Cache: Services like Cloudflare cache files globally. Purge the cache in your CDN settings.
Start with a hard refresh, then clear caches layer by layer. If issues persist, try disabling caching plugins or contacting your hosting provider. For long-term solutions, use child themes for updates, plan cache management, and consider professional support for complex problems.
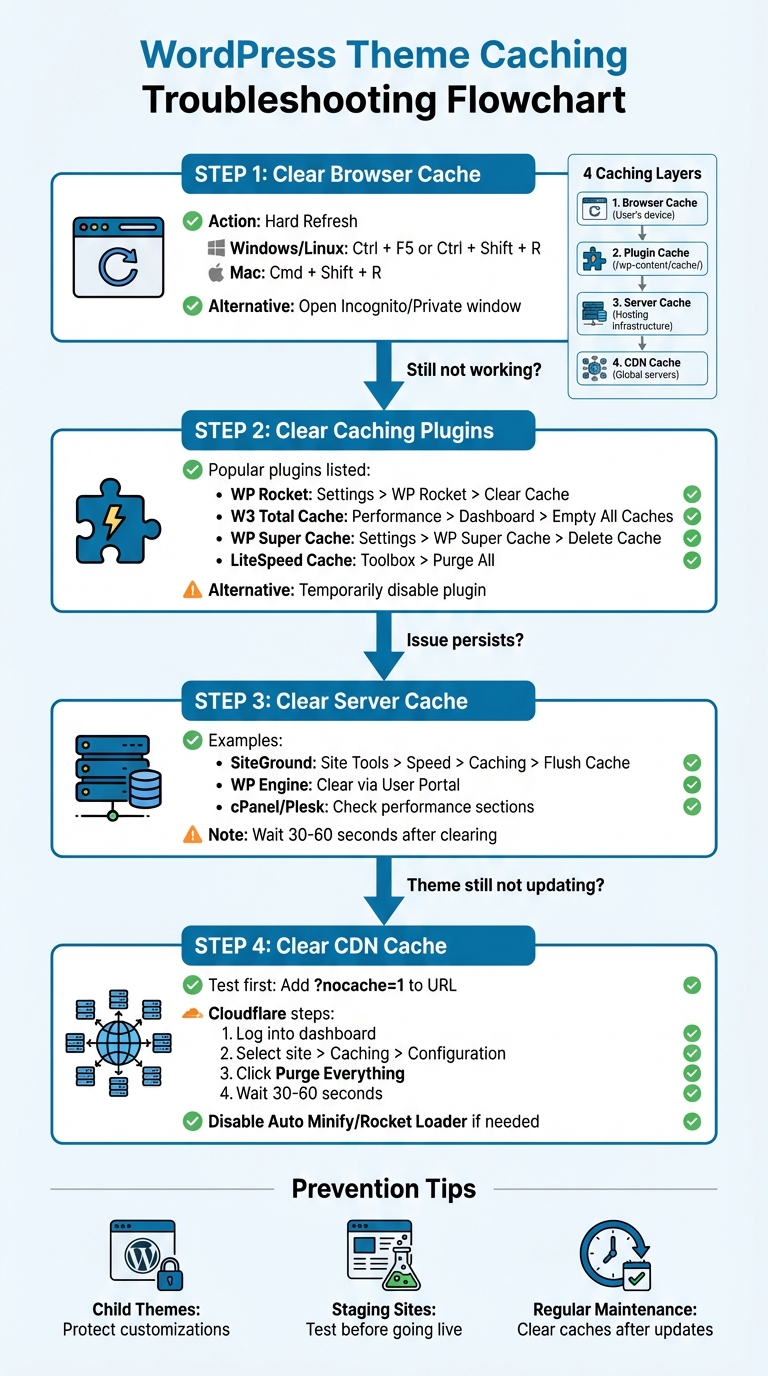
WordPress Theme Caching Troubleshooting Flowchart: 4-Step Fix Guide
Unexpected Issues After WordPress Theme Update & How To Fix Them 🛠️
The 3 Main Caching Layers in WordPress
WordPress caching operates across three key layers: browser, server, and plugin caching. Understanding these layers is essential for identifying which cache might be causing your theme updates to not display properly. Let’s break down each layer to help pinpoint the issue.
Browser Cache
Start by checking the browser cache. Browsers store static files like CSS, JavaScript, and images on the user’s device to speed up loading times. However, this can result in outdated theme files being displayed even after updates. A quick fix is performing a hard refresh – press Ctrl+F5 on Windows or Cmd+Shift+R on Mac – to force the browser to fetch updated files. Clearing this cache is often the first step in troubleshooting theme update problems.
Server Cache
Next, examine the server cache. This caching layer is managed by your hosting provider and is designed to reduce server load while speeding up page delivery. Server-side caching stores data such as database query results (object cache) and pre-generated HTML pages (page cache). Managed hosting providers often include server caching by default, which can inadvertently retain outdated theme files. Clearing the server cache through your hosting dashboard or contacting support can resolve this issue.
Caching Plugins
Finally, review your caching plugins. Tools like WP Rocket and W3 Total Cache generate static HTML versions of dynamic pages to improve site performance. These plugins typically store cached files in the /wp-content/cache/ directory and may also include features like minifying CSS and JavaScript. While these optimizations boost speed, they can sometimes prevent theme changes from appearing right away. Clearing the plugin cache or temporarily disabling the plugin can help resolve conflicts.
Here’s a quick-reference table to summarize the caching layers:
| Caching Layer | Storage Location | Controlled By | Primary Assets |
|---|---|---|---|
| Browser Cache | User’s local device | End-user/Browser settings | Static files (CSS, JavaScript, images) |
| Server Cache | Hosting infrastructure | Hosting provider | Database queries, PHP scripts, HTML |
| Caching Plugins | /wp-content/cache/ directory |
Site administrator | Static HTML versions of dynamic pages |
How to Fix Theme Caching Issues
Tackling theme caching issues can be a bit tricky, but starting with the easiest solutions and working your way up to more advanced fixes is the best approach.
Clear Browser Cache and Perform a Hard Refresh
The first step is to do a hard refresh, which forces your browser to ignore its local cache and fetch fresh files from the server. Here’s how to do it:
- Windows/Linux: Press
Ctrl + F5orCtrl + Shift + R. - Mac: Press
Cmd + Shift + R.
If this doesn’t work, clear your browser cache manually. Here’s how to do it in popular browsers:
- Chrome: Open the three-dot menu, go to More Tools > Clear browsing data, select "All time", check "Cached images and files", and hit Clear data.
- Firefox: Click the hamburger menu, choose History > Clear Recent History, select "Everything", check "Cache", and click OK.
- Edge: Open the three-dot menu, navigate to History > Clear browsing data, choose "All time", check "Cached images and files", and click Clear now.
- Safari: Go to History > Clear History and select the desired range. Alternatively, enable the Develop menu in Safari’s settings (Safari > Settings > Advanced) and choose Develop > Empty Caches.
"Clearing your browser cache forces it to download the latest version of a website." – WPBeginner
If the issue persists, try opening your site in an Incognito or Private window. This can help determine if the problem is browser-related. If the problem remains, move on to your caching plugins.
Disable and Clear Caching Plugins
Most caching plugins for WordPress provide an option to clear the cache directly from the admin toolbar. Before you do this, save any unsaved work, as the dashboard might refresh during the process. Here’s how to clear the cache in popular plugins:
- WP Rocket: Go to Settings > WP Rocket and click Clear Cache.
- W3 Total Cache: Navigate to Performance > Dashboard and select Empty All Caches.
- WP Super Cache: Head to Settings > WP Super Cache and click Delete Cache under the "Delete Cached Pages" section.
- LiteSpeed Cache: Open the LiteSpeed Cache settings and select Purge All under the Toolbox section.
Clearing the cache removes temporary files, but it may slow down your site briefly while static files are rebuilt. If this doesn’t resolve the issue, try deactivating the caching plugin to see if it’s causing the problem. You can reactivate it once the issue is resolved. If the problem persists, it’s time to address server-side caching.
Clear Server Cache
Server-side caching is managed at the hosting level, often independently of plugins. Many hosting providers offer built-in caching tools. For example:
- SiteGround: Log into Site Tools, navigate to Speed > Caching, and click Flush Cache for both Dynamic and Static caches.
- WP Engine: Clear your site’s cache via the WP Engine User Portal.
If your host uses control panels like cPanel or Plesk, look for caching options in the performance or optimization sections. Some hosting services use caching systems like Varnish or Nginx, which may require clearing through their specific tools. When in doubt, contact your hosting provider for assistance. After clearing the server cache, wait 30–60 seconds before refreshing your site. If the issue persists, consider checking for conflicts with your CDN.
Fix CDN Cache Conflicts
Content Delivery Networks (CDNs) like Cloudflare store static file copies on servers worldwide to improve load times. However, this can sometimes cause delays in displaying theme updates. To check if the CDN is the culprit, add ?nocache=1 to the end of your URL (e.g., yoursite.com/?nocache=1). If the updated theme appears, the issue likely lies with the CDN cache.
To clear Cloudflare’s cache:
- Log into your Cloudflare dashboard.
- Select your site and go to Caching > Configuration.
- Click Purge Everything.
- Wait 30–60 seconds, then refresh your site.
If the layout still seems off, try temporarily disabling CDN-level optimizations like Auto Minify for CSS/JavaScript or Rocket Loader, as these features can sometimes interfere with theme scripts.
Here’s a quick reference for no-cache URL parameters:
| Plugin/Standard | No-Cache URL Parameter |
|---|---|
| General (Standard) | example.com/?nocache=1 |
| WP Rocket | example.com/?nowprocket |
| LiteSpeed Cache | example.com/?LSCWP_CTRL=before_optm |
| Autoptimize | example.com/?ao_noptimize=1 |
| FlyingPress | example.com/?no_optimize |
| Perfmatters | example.com/?perfmattersoff |
sbb-itb-976b402
How to Prevent Caching Problems
Avoiding caching headaches starts with smart development practices and regular maintenance.
Use Child Themes for Customizations
Editing your parent theme directly is a recipe for disaster – any updates to the theme will erase your changes. Instead, use child themes to keep your customizations safe. As WordPress Developer Resources explains:
Child themes… allow parent themes to be updated without losing your modifications.
Setting up a child theme is simple. Create a new folder with a style.css file that includes a Template: header pointing to your parent theme’s folder name. Add a functions.php file to your child theme folder – this file loads before the parent’s, and any template files (like header.php or footer.php) in the child theme will override the parent theme’s corresponding files. When referencing images or scripts, use get_stylesheet_directory_uri() to ensure WordPress points to the right paths. After making edits, don’t forget to manually clear your caching plugin and server cache, as these might not register file changes automatically.
Plan Cache Management During Development
When making theme changes, work on a staging site and disable cache in your browser’s Developer Tools to see updates in real time. You can also use no-cache parameters (like ?nocache=1) or open incognito windows to bypass cached versions of your site. Identify critical files early on – such as scripts or animations – and exclude them from caching to avoid conflicts during development.
Regular Maintenance and Professional Help
It’s essential to clear caches regularly, especially after publishing new content or tweaking settings. As Cornershop Creative points out:
Caching is a double-edged sword: the same ‘pre-loading’ that caching relies on can lead to updated content not showing up on your pages, or can prevent new functionality/plugins from working immediately.
The best approach is a step-by-step purge. Start with your theme cache, then move on to third-party plugin caches, server-side caches from your hosting provider, and finally, your CDN cache if you’re using one. Regularly reviewing error logs can also help you spot caching problems early.
For added peace of mind, consider hiring professionals. Companies like WP Support Specialists offer maintenance plans that include 24/7 monitoring, regular backups, and efficient cache management. Their premium plans also include enhanced security, speed optimization, and faster response times. With expert support handling everything from cache issues to plugin updates, you can focus on growing your business while they ensure your WordPress site runs smoothly.
Conclusion
Summary of Fixes
Theme caching problems often stem from conflicts across various caching layers, including the browser, plugins, server, and CDN. As mentioned earlier, these issues usually originate within one of these layers.
To address the problem, clear caches in a step-by-step manner. Start with a hard refresh (Ctrl+F5 on Windows or Cmd+Shift+R on Mac). Then, move on to clearing the caching plugin, followed by the server cache, and finally, the CDN cache. Adding ?nocache=1 to your URL can bypass all caching layers and help confirm the source of the issue. If aggressive optimizations like CSS minification or JavaScript deferral are causing trouble, disable these features one at a time and exclude any problematic files. Additionally, using a child theme for customizations and planning cache management during development can help minimize future issues.
If these solutions don’t resolve the problem, it’s likely time to seek expert assistance.
When to Get Professional Help
When clearing all four caching layers still doesn’t fix outdated content or broken layouts, it’s a clear sign that professional help is needed. Persistent errors, such as 504 responses or database-related problems, often require advanced troubleshooting.
WP Support Specialists offers 24/7 WordPress support, including cache management, plugin updates, security checks, and emergency fixes. With their help, you can focus on your business while they ensure your WordPress site runs without a hitch.
FAQs
How do I identify which caching layer is causing issues with my WordPress theme?
To figure out which caching layer might be causing issues with your WordPress theme, you’ll need to methodically test and bypass each type of cache: browser, CDN, server-side, and plugin caches. The goal is to see when the problem disappears, helping you identify the culprit.
Start by adding a random query string (like ?nocache=1) to your page URL and opening it in an incognito browser window. If the page loads as expected, a caching layer is likely causing the issue. Next, clear your browser cache or perform a hard refresh (Ctrl + F5). If the problem remains, try purging your CDN cache or temporarily turning off server-side caching via your hosting control panel. Finally, deactivate any caching or optimization plugins in WordPress to see if they are creating conflicts.
If none of these steps solve the problem, WP Support Specialists can step in to audit your caching setup and implement targeted fixes to get your site back on track quickly.
What can I do if my WordPress theme updates aren’t showing after clearing the cache?
If your theme updates still aren’t visible after clearing your browser, plugin, and server caches, here are a few steps to help you troubleshoot:
- Check for cache interference: Add
?nocache=1to the end of your site’s URL or open it in a private/incognito browser window. If the updated design appears, it’s likely that additional caching, like a CDN or host-level cache, is the issue. Most hosting dashboards include a quick option to purge these caches. - Temporarily disable caching plugins: Turn off any caching or optimization plugins you’re using, then clear your browser cache again. If the updates show up, tweak the plugin settings – such as excluding specific files or disabling features like JavaScript delay or CSS minification – to prevent future conflicts.
- Test with a default theme: Activate a default WordPress theme, like Twenty Twenty-Three. If it displays correctly, the issue might be with your custom theme. Double-check file paths, child-theme hierarchy, and file permissions to ensure your updates are being properly applied.
If none of these steps fix the problem, you might need to restore a backup and reapply changes in stages to pinpoint the issue. For more complicated scenarios, WP Support Specialists can conduct an in-depth cache audit, resolve conflicts, and ensure your updates go live smoothly.
Why should I use a child theme to avoid caching issues in WordPress?
Using a child theme is a smart way to safeguard your custom code and settings whenever the parent theme gets updated. It ensures that updates only replace the parent theme files, leaving your modifications untouched. This method also eliminates the risk of outdated or cached files sticking around, so your site always loads the most up-to-date assets. Plus, it makes troubleshooting easier and helps your site stay efficient while preserving your customizations.